Receive my recipes daily by email

Receive my recipes by email. Enter your EMAIL ADDRESS here:

Delivered by FeedBurner

Recipes

Friday, January 30, 2015

Chocolate & Churros

Yes, I know, this is not the healthiest of my posts, but once in a while it feels great to enjoy a
chocolate con churros with your friends, specially on a winter morning! Living in Chicago it is hard to find good churros, so I bought a "churrera" and started making them at home. If you once went to Spain and loved chocolate con churros you will be able to enjoy them at home if you follow these easy steps.

The only special equipment you will need to purchase is a "churrera", the machine that shapes the dough into churros. I got mine at LaTienda.com for only $18.95 and it works fantastically.

If you want to enjoy the real Spanish hot chocolate, you should get Chocolate Valor a La Taza, the real thick Spanish hot chocolate. Otherwise any good quality dark chocolate would work but you will need to add sugar and corn starch to thicken it.

Tips: Make the hot chocolate first and cover; then start working on the churros. The churros should be eaten right away or they will become soggy.


CHOCOLATE & CHURROS

Serves 4

2 cups of all purpose flour
2 cups of water
2 pinches of salt
3 cups of olive oil

1 Bar of Chocolate Valor a la Taza (chopped)
6 cups of milk

Sugar for dusting the churros

Start by making the hot chocolate. Heat the milk in a pan at medium heat; when the milk is warm add the chocolate. Stir over low heat until chocolate is completely dissolved and begins to thicken, about 10-15 minutes; you should stir the milk and chocolate all the time or the chocolate will easily burn on the bottom of the pan.
If you like it thicker add more chocolate or if you prefer it lighter add more milk.
Remove from heat, cover and reserve until churros are ready.


To make the dough for the churros bring the water and salt to a boil and then mix in a bowl with the flour. Working in batches transfer the dough to the churrera and start making the churros with a closed u-shape. Set them aside in a parchment paper until ready to fry.


In a deep saucepan heat the olive oil and when hot start frying the churros until golden brown and turning once. Transfer to a plate lined with paper towels and sprinkle with sugar.


Enjoy with friends!!

Thursday, January 29, 2015

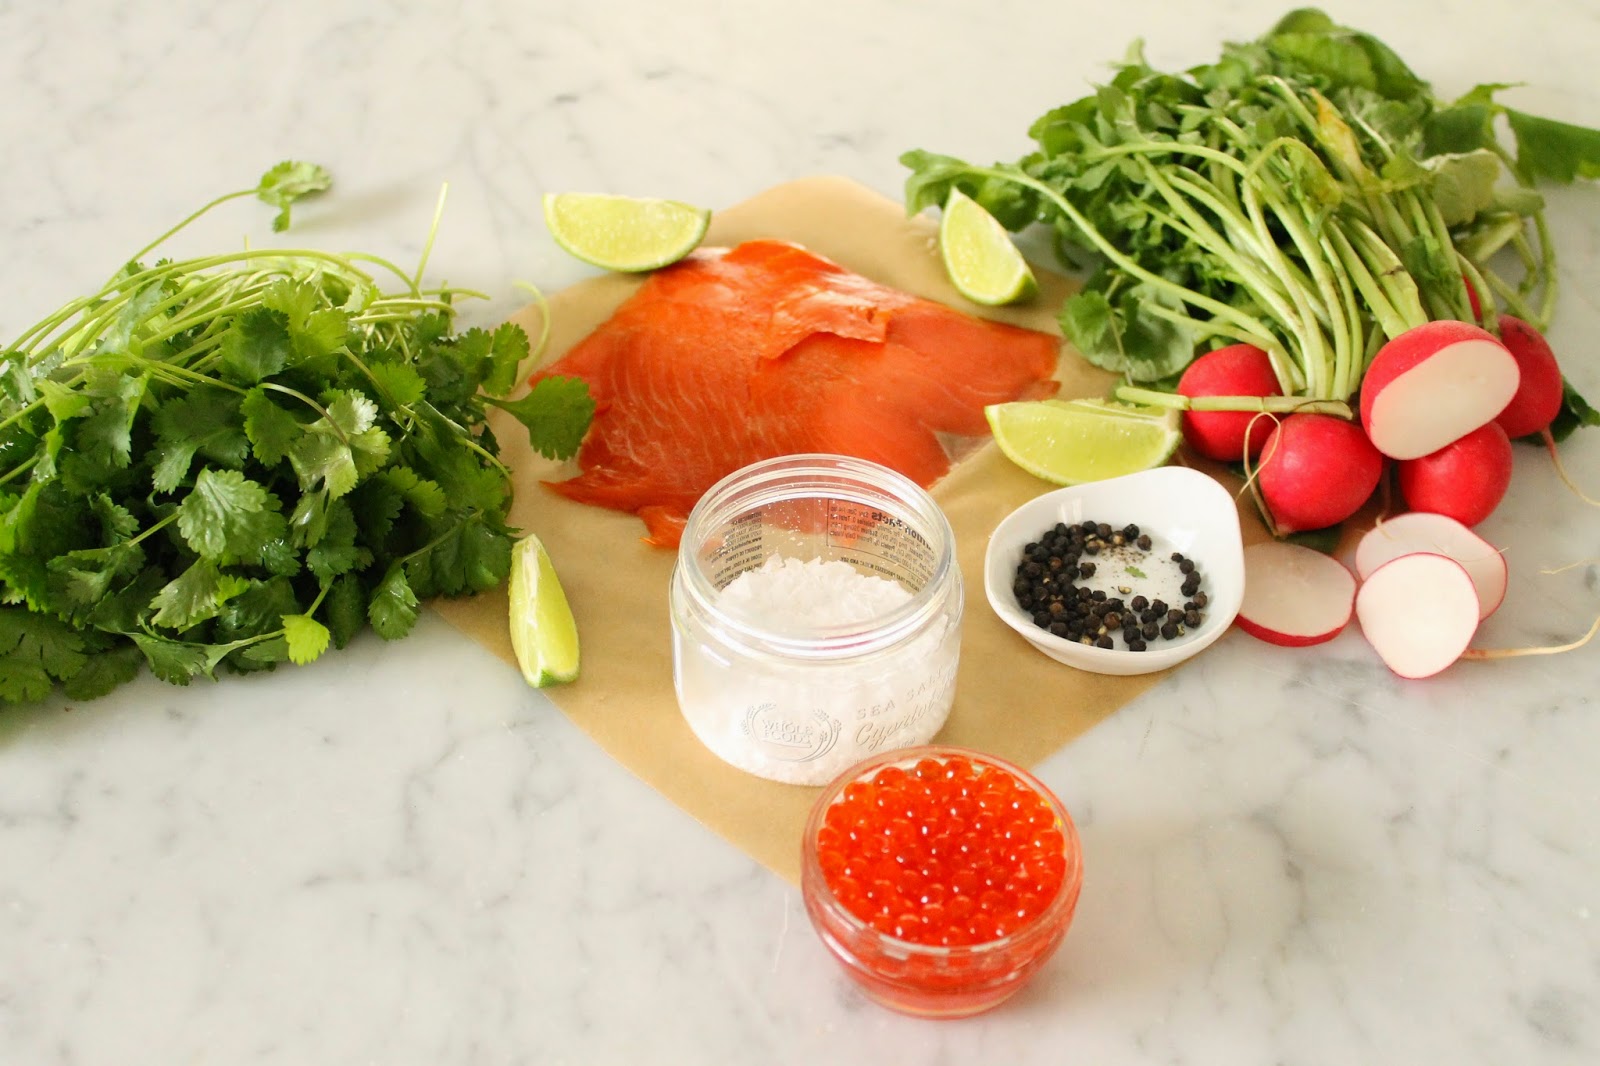
Green Lentil Salad with Smoked Salmon and Cilantro

Today's salad is loaded with iron, omega 3 fatty acids, protein and fiber!


GREEN LENTIL SALAD WITH SMOKED SALMON, CILANTRO AND LIME VINAIGRETTE

Serves 4

1 cup of green lentils (washed)
1 bay leave
4 oz smoked salmon (chopped)
1 tablespoon of capers
2 tablespoons of minced cornichons
3 tablespoons of minced cilantro
1 bunch of radishes (chopped)
2 tablespoons of salmon caviar (optional)
1lime
3 tablespoons of extra virgin olive oil
salt and pepper

In a large saucepan cover lentils with cold water, add the bay leave and a pinch of salt and bring to a boil; reduce heat to medium and boil covered for 20-25 minutes until the lentils are tender but al dente. Strain and let cool down.

In a bowl put the smoked salmon, capers, cornichons, cilantro and radishes.

Make the vinaigrette in a separate bowl with the olive oil, juice and zest of one lime, salt and pepper. Mix well and stir into the salad; mix thouroughly and decorate with lime wedges, cilantro, sliced radishes and salmon caviar.

Enjoy!


Tuesday, January 27, 2015

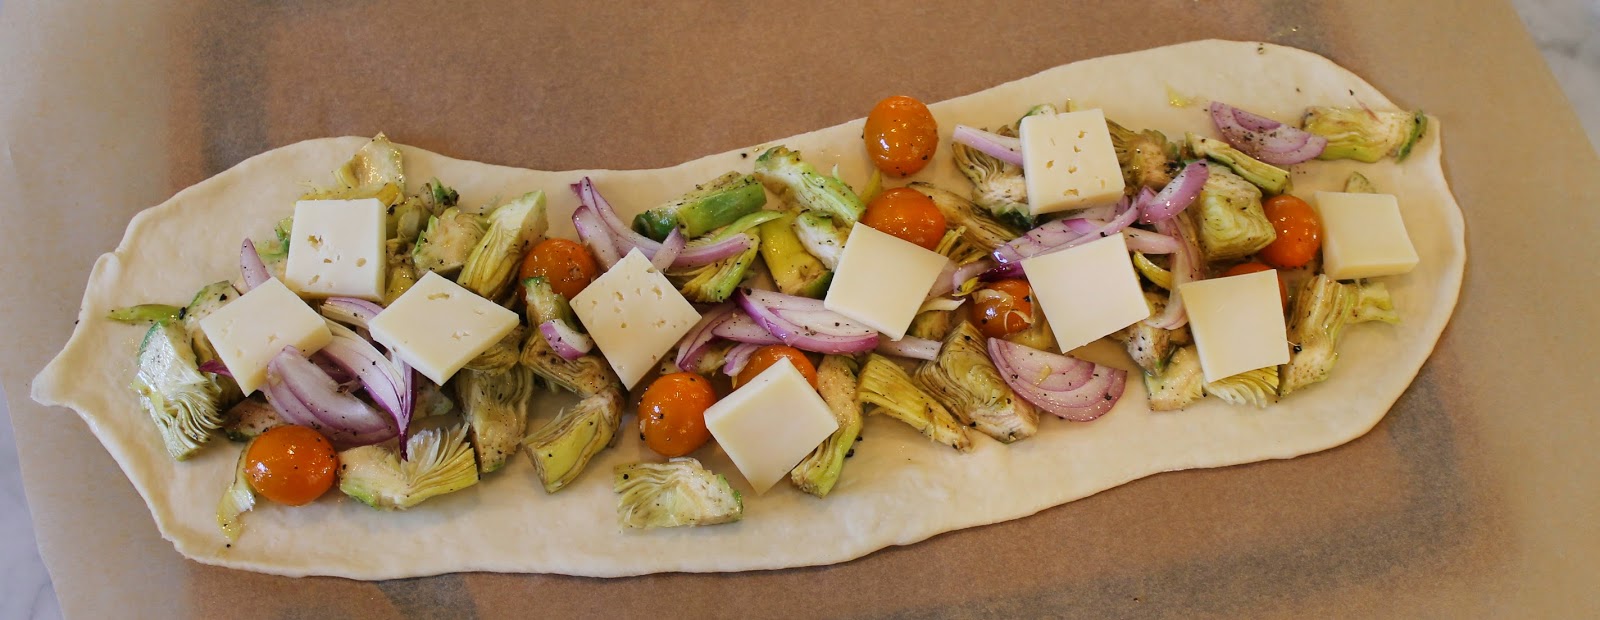
Flatbread with Artichokes, Fontina Cheese and Cherry Tomatoes

Would you like to treat your family to a homemade flatbread or pizza? Do you have guests over to watch the Super Bowl on Sunday? You should try this easy recipe and be amazed by the results!
I start by making the pizza dough with my food processor; it only takes minutes to have a good dough, then you have to let it stand for about 45 minutes, roll the dough, top it with all the ingredients and 8-10 minutes in the oven. That's all!

You will have enough dough to make two pizzas or flatbreads. My kids love pizza Margherita, so I split the dough in half and make one flatbread and one pizza Margherita; this way everyone is happy!


FLATBREAD WITH ARTICHOKES, FONTINA CHEESE AND CHERRY TOMATOES

For the dough (two flatbreads or 9 inch pizzas)

1 package of active dry yeast
1 teaspoon of granulated sugar
2/3 cup of warm water (105-115ºF)
1 and 2/13 cups all-purpose flour
1/2 teaspoon of salt
1 teaspoon of extra virgin olive oil

Toppings (for each flatbread; if you are making two flatbreads double the toppings)

5 baby artichokes
10 cherry tomatoes
1/4 of a red onion or shallot (thinly sliced)
10 cubes of fontina cheese
1 teaspoon of lemon or lime juice
1 tablespoon of extra virgin olive oil
salt and pepper

Ingredients

Dissolve the yeast and sugar in the warm water. Let stand until foamy, about 3-5 minutes.

In the food processor add flour and salt. Turn the food processor on and pour yeast mixture through small feed tube as fast as flour absorbs it. Process until dough forms a ball and then process for another 30 seconds.

Coat dough with olive oil, transfer to a bowl and cover with a kitchen towel. Let stand at room temperature (about 72ºF) for about 45 minutes.

Preheat oven to 425ºF while you continue preparing your flatbread.

Cut the dough in half if you want to make two different flatbreads/pizzas.

Place dough in a lightly floured surface and shape dough with the help of a rolling pin. For the flatbread I like to make a rectangular shape. When the shape is done, place it on parchment paper.


Prepare the artichokes:
1. remove the outer leaves until you reach the pale and tender inner leaves.
2. cut off the top of the artichoke and trim the stem.
3. cut the artichoke in half lengthwise and remove the hairy choke, if any.
4. wash well and slice.
5. once the artichokes are sliced you need to cook them fast or they will turn dark.


In a bowl place the artichokes, cherry tomatoes and sliced onions/shallots and drizzle with olive oil, lemon juice, salt and pepper. Mix well and place on top of the flatbread. Add Fontina Cheese.


Preheat oven to 425ºF and slide the flatbread and parchment paper into the oven with the help of a cutting board. Bake for 8-10 minutes until golden brown on the sides. Remove from oven with the help of a cutting board.


If you want to make a pizza Margherita, shape the dough and put tomato sauce and fresh mozzarella on top and bake at 425ºF for 8 minutes.


Enjoy!!

Sunday, January 25, 2015

Braised Brussels Sprouts with Bacon, Cranberries and Pine Nuts

This is another very easy recipe that will make your family proud of you! I prepare it in the fall or winter when Brussels Sprouts are in season. Serve it as a side or as a light lunch.


BRAISED BRUSSELS SPROUTS WITH BACON, CRANBERRIES AND PINE NUTS

Serves 4

1 and 1/2 lbs of Brussels Sprouts (trimmed and halved)
3 slices of bacon (chopped)
2 tablespoons of dried cranberries
2 tablespoons of pine nuts
1 shallot (chopped)
1/4 cup of vegetable stock
1/4 cup of Marsala wine
Salt and pepper

Place bacon in a cold stainless steel deep skillet and heat over a medium-high heat, turning occasionally, until crisp (about 4 minutes). Transfer to a plate lined with a paper towel to cool and reserve.

Add Brussels Sprouts to bacon fat left in the skillet. Season with salt and pepper. Cook at high heat, stirring often, until browned and beginning to soften (about 5 minutes).

Add shallot and cranberries and cook at low heat for 3 minutes. Add vegetable stock, cover and simmer for another 4 minutes. Add Marsala wine and cook uncovered at high heat for 2 more minutes.

Heat a small saucepan and add the pine nuts; stirring often toast the pine nuts at medium-low heat for about 1-2 minutes.

Put the Brussels Sprouts in a plate and sprinkle with the bacon bits and pine nuts.

Enjoy!

Ingredients

Place bacon in a cold skillet and cook at medium-high heat

Cook Brussels Sprouts in Bacon Fat


Saturday, January 24, 2015

Red Quinoa Salad with Mango, Avocado, Lemongrass and Herbs

Today I am making a very fancy salad, yet very easy to make. I went to Singapore a few years ago and signed up for a cooking lesson at a traditional Kampong House in the remote island of Palau Ubin. It was a very unique experience! First we went searching for different herbs, roots and plants that were scattered around the rainforest, then we minced everything finely and mixed it with long grain white rice; we also made sambal (a sauce made with chili peppers) and had it on the side.

I adapted this recipe to the ingredients I could find back home in Chicago and substituted white rice for red quinoa. I also added a vinaigrette since I was not making sambal.  You will have a great salad as long as you use all the herbs, roots and plants you can find in your grocery store, the more you put into your salad, the better it will be. You can add or substitute anything; you can use brown rice, white rice, quinoa, farro, beans...

Since it is still winter, I like to add a warm ingredient to the salad. In this case, I am cooking the quinoa and when it is still warm I am adding all the ingredients.

You can make this salad when you have guests and it will look amazing and very original if you place it on a banana leave.


RED QUINOA SALAD WITH MANGO, AVOCADO, LEMONGRASS AND HERBS

Serves 4

1 and 1/2 cups of red quinoa
1 and 1/2 cups of water
1 avocado (small cubes for salad and slices to decorate)
1 mango (small cubes for salad and slices to decorate)
2 tablespoons of minced fresh turmeric
2 tablespoons of minced lemongrass
2 tablespoons of minced parsley
2 tablespoons of minced mint
2 tablespoons of minced chives
2 tablespoons of minced marjoram
1 cup of micro green kale
4 kumquats

For the vinaigrette

4 tablespoons of extra virgin olive oil
zest of one lime
juice of one lime
salt and pepper

In a medium saucepan put the quinoa and water and bring to a boil; cover and simmer for 15 minutes; remove from heat and let rest for 5 minutes before uncovering. Remove with a fork and transfer to a bowl.

Add the cubed avocados, cubed mangos, turmeric, lemongrass, parsley, mint, chives and marjoram.

Add vinaigrette and mix well. Transfer to a serving plate, bowl or banana leave and decorate with sliced mango, avocado, kumquats and micro green kale.

Enjoy!!

Add all the herbs, roots and plants you can find and mince them finely

Presentation in a bowl


Friday, January 23, 2015

Mussels Normandy Style with Hand Cut Fries

This is a local dish from Normandy. It is extremely easy to make and you can have a pot of steaming mussels on the table in 15 minutes. It is mandatory to eat with your fingers! Also, don't forget a crusty baguette for mopping up the sauce!

Tips: You can substitute crème fraîche for sour cream.


MUSSELS NORMANDY STYLE WITH HAND CUT FRIES

Serves 4

1 lb. of mussels
1 shallot (minced)
1/2 cup of dry white wine, calvados or cider
2 tablespoons of butter
1 tablespoon of extra virgin olive oil
1 tablespoon of parsley (chopped)
2 sprigs of thyme
two bay leaves
3 tablespoons of crème fraîche (or sour cream)
salt and pepper

2 russet potatoes
1 cup of extra virgin olive oil
salt and pepper

Heat a deep saucepan and add butter and olive oil, then add shallots, thyme and bay leaves and cook at low heat for about 3 minutes until the shallots are soft.

Add the mussels and wine and cover; cook at low-medium heat until the mussels are open for about 3-5 minutes. With a slotted spoon transfer mussels to a deep serving bowl and cover to keep warm.

Bring pan juices to a boil over high heat and cook until reduced to half (3 minutes). Remove from heat and add the crème fraîche, salt and freshly ground pepper. Pour over the reserved mussels and sprinkle with chopped parsley.

Peel and cut the potatoes in long thick slices, then cut them again vertically. Heat the olive oil in a deep skillet and working in batches add potatoes when the oil is hot; cook at medium heat for about 4 minutes until crispy in the outside and soft in the inside. Transfer to a plate lined with a paper towel. Season with salt and pepper.

Enjoy!!

Ingredients

Shallots and herbs

How to cut the potatoes

Thursday, January 22, 2015

Butternut Squash Soup with Toasted Pumpkin Seeds and Creme Fraiche

This is my absolute favorite winter soup! The squash gives it a sweet taste and the honeycrisp apple a tangy flavor, which makes the perfect combination. In my family we start eating this soup on Thanksgiving Day and have it until the end of winter.  I know it takes a while to peel and cube the squash, but if you don't have the time to do it, you can buy the pre-peeled and pre-cubed butternut squash, which you can easily find at any grocery store during this time of the year.


BUTTERNUT SQUASH SOUP WITH TOASTED PUMPKIN SEEDS AND CREME FRAICHE

Serves 4

1 medium size butternut squash
1 leek (washed and chopped) (discard green part)
1 honeycrisp apple (peeled and chopped)
3 tablespoons of extra virgin olive oil
3 cups of chicken or vegetable stock
3 tablespoons of pumpkin seeds
2 tablespoons of creme fraiche
salt and pepper

Cut the butternut squash in half; peel it, remove the seeds and chop it in cubes.

Heat a large saucepan, add the olive oil and the leeks, reduce heat to medium-low and cook for about 3 minutes. Add the squash and apple and cook at medium heat for about 4 minutes. Add the vegetable or chicken stock and simmer covered for about 45 minutes or until the squash is very soft. Season with salt and pepper.

Working in batches puree soup in blender. Transfer to serving bowl and decorate with freshly ground black pepper, toasted pumpkin sees and dollop of creme fraiche.

Enjoy!!

Always use fresh and healthy ingredients

Cubed squash
Discard green part of leek


Chopped leek


Wednesday, January 21, 2015

Veal Scaloppine Marsala with Cremini and Shiitaki Mushrooms and Potatoes


Tips: 

How to clean mushrooms: Use a damp paper towel or a soft mushroom brush to wipe each mushroom. Do not soak mushrooms in water since they will absorb it like a sponge and will not brown when cooking.

You can make this recipe also with chicken if you prefer.

You can also make this recipe gluten-free using another type of flour to dust the veal.

VEAL SCALOPPINE MARSALA WITH CREMINI AND SHIITAKI MUSHROOMS AND POTATOES

Serves 4

1 lb of veal scaloppine
1/4 cup of flour
1/2 lb shiitake mushrooms
1/2 lb cremini mushrooms
1 shallot (minced)
2 sprigs of thyme
1/2 cup of extra virgin olive oil
1/2 cup of marsala wine
2/3 cup of vegetable or chicken stock
salt and pepper

Season the veal with salt and pepper; place flour in a large plate and lightly dust the veal scaloppine. Preheat a large skillet and add 1/4 cup of olive oil; working in batches add the veal to the pan and sauté at medium heat turning once until golden brown on both sides (no more than 1 minute per side).  Add more oil to the pan if you need it. Transfer scaloppine to a plate and reserve.

Use the same skillet and remaining oil and add the shallot; cook at low heat for 3 minutes; add marsala wine, stock, thyme, salt and pepper and cook at high heat for another 3-4 minutes until reduced in half. Transfer the scaloppine back to the skillet and simmer covered during 2 minutes.

Preheat another deep sauté pan until very hot and then add three tablespoons of olive oil, the mushrooms (cleaned and sliced), salt and pepper. Cook at high heat for 7 minutes, turning occasionally, until golden brown and all liquid has evaporated.

Arrange the scaloppine in a serving platter with the sauce and the mushrooms on top.

POTATOES

3 russet potatoes (peeled and thinly sliced)
flake sea salt
1 and 1/2 cups of extra virgin olive oil
chives

In a deep and large skillet heat the olive oil and add the potatoes; cook at medium heat for about 12 minutes turning occasionally until golden brown on the sides. Transfer to serving platter with a slotted spoon and add flake sea salt. Decorate with chopped chives.

Enjoy!

Ingredients

Mushrooms

Tuesday, January 20, 2015

Roasted Cauliflower with Red Onion and Parmesan


Here is another winter vegetable: cauliflower. If you think you don't like cauliflower, you might change your mind if you follow this recipe. It is really simple and the result is amazing; your family and friends will be surprised at how good cauliflower tastes.


ROASTED CAULIFLOWER WITH RED ONION AND PARMESAN

Serves 4

1 head of cauliflower
1 red onion
3 unpeeled garlic cloves
3 thyme sprigs
3 tablespoons of extra virgin olive oil
1/2 cup of grated Parmesan
Salt and pepper

Preheat oven to 425 degrees F.
Wash and cut the cauliflower into florets and put them in a large baking sheet; slice the onion and add it to the baking sheet together with the garlic cloves, thyme, olive oil, salt and pepper; toss well.
Roast for about 30 minutes tossing occasionally; sprinkle with the grated Parmesan and toss to combine; roast for another 10 minutes.

Cauliflower is ready to go in the oven


Monday, January 19, 2015

Beet Salad Greek Style with Feta Cheese, Walnuts and Kalamata Olives

I am naming this beet salad "Greek style" because Greece is where I discovered that you can actually eat the green part of the beets and that it tastes great! This salad takes 10 minutes to prepare and admits many variations: you can put feta cheese, goat cheese, ricotta salata, mozzarella or burrata; you can put walnuts, pine nuts, pecans or pistachios.

Tips: I like to put the greens warm and the rest of the ingredients at room temperature. This will make a great winter salad!


BEET SALAD GREEK STYLE WITH FETA CHEESE, WALNUTS AND KALAMATA OLIVES

One bunch of beets with greens
Feta cheese
1/2 cup of walnuts
1/2 cup of kalamata olives
3 tablespoons of extra virgin olive oil
1 tablespoon of balsamic vinegar of Modena
Cream of balsamic
salt and pepper

Please see my post about how to cook and select beets http://saffronandsun.blogspot.com/2015/01/warm-salad-of-herring-beets-and-baby.html

Wash and chop green part and stem of the beets. In a medium saucepan boil greens and stems with one teaspoon of salt at medium heat for 4 minutes. Drain and transfer to a serving platter. Peel the beets and thinly slice them and place them on top of the greens in your serving platter.  Add feta cheese, olives and walnuts. Season with salt and pepper and drizzle with extra virgin olive oil, balsamic vinegar and cream of balsamic.

Enjoy!

Ingredients


Sunday, January 18, 2015

Citrus Chicken with Roasted Red Cabbage

Red cabbage is a winter vegetable; now is the perfect time to eat it! Roasting a chicken is easy and if you add oranges and lemons it will be delicious!

This is the perfect Sunday dinner: I suggest you prepare the chicken and cabbage and put it in the oven a couple of hours before planning to serve dinner. You are now free to do the chores around the house or just relax; when you are finished lunch or dinner will be ready for all the family. Don't forget to ask your children to set the table in the meantime!


Tips: Always let your chicken come to room temperature before placing it in the oven. Take the chicken out of the fridge at least 45 minutes before roasting.

Always dry your chicken really well on the outside with paper towels. By drying your chicken you will ensure a great browning.

You can either roast the chicken placed on a rack or directly on the roasting pan.  I suggest you roast it directly on the pan if you are a beginner cook or don't want to check your roast every 20 minutes. If you place the chicken in the rack, you will need to add chicken stock or water every once in a while but you will ensure your chicken cooks evenly and doesn't stick to the pan.

I like to roast the chicken at low temperature since it will be very tender and juicy. However, it will take a little longer to cook. If you want to speed it up, you can increase your oven temperature to 380-400 degrees Fahrenheit and reduce the roasting time to 45 minutes to one hour.

You can roast the cabbage at the same time with the chicken but in different pans. Also adjust the roasting time for the cabbage if you are increasing oven temperature.


CITRUS CHICKEN

1 whole chicken
2 oranges (cut in 10-12 pieces)
1 lemon (cut in 10-12 pieces)
salt and pepper
2 tablespoons of extra virgin olive oil
1 cup of chicken stock

For the sauce: 

1/2 cup of sweet white wine (like amontillado sherry or any other sweet wine)
1 tablespoon of honey
1 tablespoon of brown sugar

In a roasting pan place the chicken breast side up. Stuff the chicken with orange and lemon sections and place the rest of the citrus in the pan around the chicken. Season with olive oil, salt and pepper. Add the chicken stock to the bottom of the pan.
Preheat oven to 450 degrees F and roast for about 10 minutes. Decrease oven temperature to 350 degrees F and cook for about 1 and 20 minutes or until a thermometer inserted in the meaty part of the thigh registers 165ºF.
If you are using a rack you will need to add chicken stock or water to the bottom of the pan every 20 minutes or whenever the liquid has dried out.
Transfer the chicken to a cutting board and let it stand for 15 minutes before carving.
Meanwhile, transfer all the juices and drippings left in the pan to a small saucepan. Using a fine-mesh sieve, strain juices left in the orange and lemon sections directly into the saucepan. Add 1/2 cup of wine, honey and brown sugar and let cook at high heat so that the alcohol evaporates for about 3 minutes. Season with salt and pepper.
Carve the chicken and serve the meat drizzled with the sauce.

ROASTED RED CABBAGE

1 cabbage
2 tablespoons of extra virgin olive oil
2 teaspoons of ground cumin
4 cloves
salt and pepper

Slice cabbage in half lengthwise. Use a sharp knife to cut a V-shaped notch around the white core and discard it. Slice both pieces in half again so you have four quarters. Slice the cabbage again in quarters and then thinly slice each piece crosswise into 1/4-inch-thick strips.

In a large mixing bowl toss the cabbage with olive oil, cumin, cloves, salt and pepper. Transfer to a baking pan. Tightly cover with aluminum foil and bake at the same temperature set for the chicken 30 minutes. Remove foil and continue cooking for another 10 minutes.

Preparing the chicken

How to cut the cabbage

Cabbage is out of the oven

Roasted chicken should reach a temperature of 165 degrees F when inserted in the thigh

Smash the citrus to get the juice into the sauce. Strain through a fine-mesh sieve.


Saturday, January 17, 2015

Honeycrisp Apple Compote


I usually make apple compote every week during fall when honeycrisp apples are in season. However, since this year I can still get honeycrisp apples at Whole Foods Market this late in the season, I still make compote in January...that is how much we like honeycrisp apple compote at home!
You can make a large batch of apple compote and you will have a healthy breakfast for the entire week. You can also have it as a dessert or even as a snack.
You can add more or less sugar depending on how sweet you like it.

Tips: You can use any type of apple, but depending on the variety the cooking time would be different. For best results use firm apples.
You can also add any dried fruit like cranberries, blueberries, cherries, etc... and if you like it you can cook it with a stick of cinnamon.

Honeycrisp Apple Compote:

8 honeycrisp apples (peeled, cored and cut in eights)
3 tablespoons of brown sugar
Zest of 1 lemon
1/2 cup of dried prunes
1/2 cup of dried apricots
3 cups of water
1 stick of cinnamon (optional)

Peel, core and cut the apples in eight thick slices. With a potato peeler cut the zest of the lemon without the white pith. Put the apples, lemon zest, brown sugar, prunes, apricots and water in a large saucepan. Bring to a boil and reduce heat to low. Cook covered for 18 minutes. Let cool down and transfer to a glass container or serving bowl. Ready to eat! Enjoy cold or room temperature!

Honeycrisp apples are in season in late September through October


Cut the apples in eight sections

All the ingredients are ready to cook!

You will have compote for the entire week!

Store the compote in a glass jar

Put a nice label and a bow and give it to someone you love!